Environment/lighting artist
VFX SenioR thesis
VFX_488/update_12
May 19th, 2026
Scene 3 Final Comp
Due to some time constraint limitations, I decided to do the compositing work on the final scene of the film. Below is all of the shots for final pixel.
VFX_488/update_11
May 17th, 2026
Shot 5 Full Render
And the final shot is all rendered out! There is a single erroneous frame to correct but otherwise the shot is complete. All that's left to do is to do the compositing which I'm relying on my friend Sydney for.
Full Film Preview
Here's the full film with an end credits. It just needs the last shots to be comped (stated above).
VFX_488/update_10
May 5th, 2026
Exterior Refinement
Got a lot to talk about here! This past week has been refining the environment for the beginning of shot 5. I really wanted this rustic look for the exterior of the house to contrast this really ethereal interior (more on that later).

I'm using a few fun methods to blend between materials here. I have 2 different materials for the wooden boards, courtesy of Quixel Bridge. I'm blending between these materials using ambient occlusion, simulating the wear and tear on the edges of each board and near the edges of the boards.

I've also added a layer of foliage like the reference. This is still subject to change (if I have time).

One important detail to achieve realism is to blend it with the environment. This meant adding dirt near the ground. I achieved this by simply using vertex color assignments. This is a lot less memory intensive than using a texture. It may look sloppy here, but it really does blend nicely in the shader.

Interior Refinement
We're back with ray portals! As stated before, I want the interior of the cabin to be wildly different than the exterior. To accomplish this, I used a similar technique to how I did the first transition.

Essentially I'm using a ray portal node on the geometry around the windows while offsetting the ray positions vertically down. That way I can have an entirely different environment under the ground and display it on the geo!


Projected Env
Cam Env
I would say that the interior is about 35% of the way there. I am still weighing my options on what I want to do for furniture and materials.
VFX_488/update_09
April 26th, 2026
Modeling The House
Part of working on the final scene has been modeling the house for the shot. It currently has the start to a detailed exterior and has the interior completed. There were clipping issues to address with the interior that needed to be solved. The current plan is to have an overgrown roof, hence why there is a lot bumpiness.


I'm currently trying to match to the reference to the best of my abilities, but the reference unfortunately does not give much detail aside from the front facade.


I've also began to work on the shaders, but I feel that I'd want the house to look more rustic.

VFX_488/update_08
April 26th, 2026
Almost There!
Beyond the Canvas is in the final stretch! Every shot has been completed save for the transition between the first and second scene.
The last scene needs to be re-rendered as the environment wasn't being rendered at full resolution. Otherwise it's complete.
Second Transition Do-Over
I wasn't very happy with how the second transition looked in the previs. I felt the camera was a little too stiff and didn't carry over too well. Below is a movement that I think works a lot better.
VFX_488/update_07
April 19th, 2026
Working out the Final Shot
The final shot of Beyond the Canvas is essentially the first shot but reversed. I spent this weekend working out the timing and look for the final shot, BUT all I have to show for it is a screenshot for the moment due to... RENDER ERRORS! :D


The main issue was that the render farm kept failing with "segmentation errors", likely due to the fact that I was running out of memory. Rendering on a GPU has its advantages, but the main disadvantage is that texture memory is much more limited than with a CPU.

Because I don't have access to a texture cache here, unfortunately I am limited to managing texture resolutions. I'm currently working on a fix.
VFX_488/update_06
April 14th, 2026
Final Adjustments for Scene 3
I had some extra time over the past couple of days to touch up the materials for the third scene of the animation. I focused specifically on the ice and snow.

I wanted to give the ice a more spotty looking feel to it while also keeping it relatively clean.

The adjustments I made to the snow material actually ended up making the scene brighter overall, but I think that adds to the look.
In addition, I added a more rocky surface to the base of the house. Hopefully this should blend in better with the snow.

VFX_488/update_05
April 12th, 2026
First Transition
This weekend gave me the opportunity to do some tests on how I could accomplish the transition from the lake scene to the arctic scene.
This also gave me a chance to look over the arctic scene and note what I need to correct. Particularly I need more detailed ice and an improved snow material with less color variation.
Creating the transition itself was actually quite easy. It was a job of matching the shots between scenes and then doing a cross dissolve in Davinci Resolve.

VFX_488/update_04
April 4th, 2026
First Render Checkpoint
I've had a bit of time to work on the third scene and fully prep it for rendering. I made a lot of adjustments to the third scene and I can almost consider it final.
Since all of my environments are near completion/completed, my next focus will be to create the transitions for each scene, starting with the transition from scene 2 to 3.
VFX_488/update_03
March 31st, 2026
Finalizing the Second Scene
I've spent the last day finalizing the progress on the second scene. I've had a few frames fail due to the render times going above the 2 hour limit on the render farm, but that's been sorted out.
After looking at the render, though, something seemed off... atmosphere! It was early morning on a lake but I was missing the essential part of that environment. Adding that little bit of fog really helped bring out the lighting work that I put into the shots.


I also finalized the look of shot 6's ground so that it would be properly populated with foliage.

VFX_488/update_02
March 29th, 2026
Refining the Second Scene Continued
This weekend gave me a great opportunity to finally start working on the little details in the second scene. I really enjoy the detailing process of making an environment feel truly alive and it was great to get into the nitty-gritty of this environment.

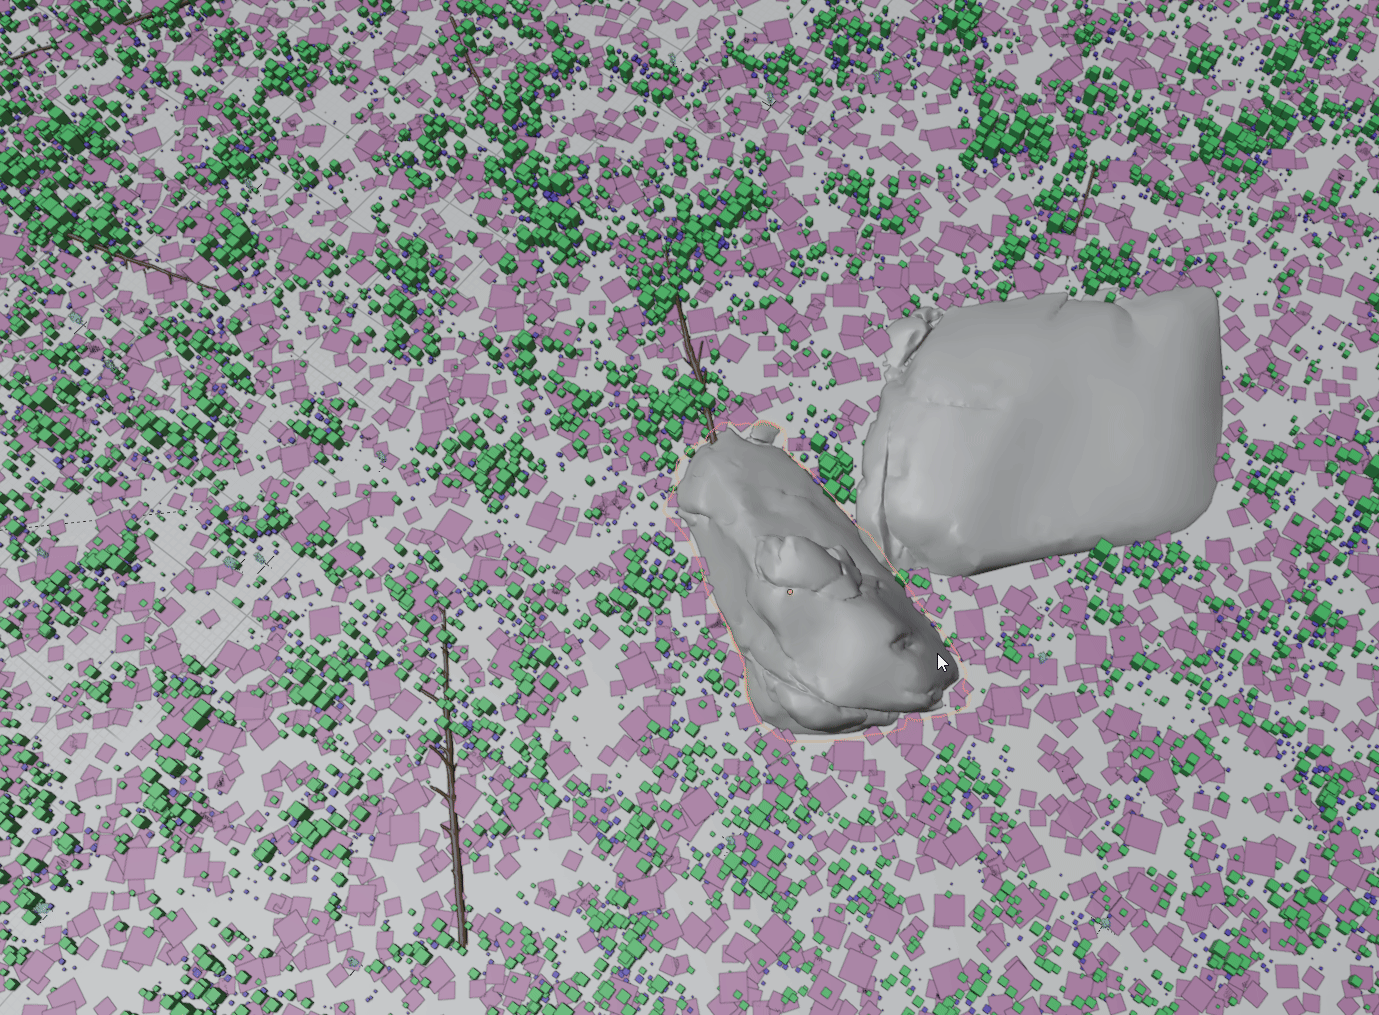
The rock formations in particular saw a huge glow-up from the last time I showed them. Combining various photo-scanned rock formations, they were lain out across the environment. Foliage is placed to hide their seams to the original island mesh.

Something that I stated earlier in this project a few times was that I wanted to keep this as non-destructive as possible. That means that I should be able to go back and change something and see results quickly. As an example, the house's windows are modeled using booleans the stilts uses geometry nodes.

I also upgraded the lighting and sky, giving the whole image a "warmer" look.

Before

After
VFX_488/update_01
March 24th, 2026
Refining the Second Scene
To start off the quarter I spent my time refining the second scene further. The first element I wanted to work on was the coastline rocks. I felt as if there weren't enough to make the coast feel truly alive. I spent some time setting up some scatter systems for extra moss and adding more rocks to help the island feel more natural.

Additionally, I've began on modeling the basic structure for the lakehouse. I have some rudimentary textures applied as well as a good base location for where it's going to be. It's going to need some furniture models and other structures, but that will come later.

VFX_448/update_18
March 22nd, 2026
Final Render Checkpoint
Due to the renderfarm misbehaving, I had lost some time when it came to preparing the environment for final render. I instead focused on rendering tests of the final environment, and below is what I was able to accomplish.
Moving Forward
I've now reached a point in my project where I can lay out the rest of what I need to accomplish in a list. This list could change if need be, but generally speaking these are my goals:
-
Model the lake house & dock for scene 2
-
Model the house for scene 3
-
Populate scene 3 with foliage and rocks (maybe weather FX too)
-
Fix foliage for shot 6
-
Fix waterline for scene 3
-
Create transitions for environments
-
Composite all shots (Nuke or Fusion)
-
Add birds to shots 4 and 6 (if time allows)
VFX_448/update_17
March 8th, 2026
Troubleshooting the Renderfarm
Unfortunately the renderfarm wasn't behaving all that well this weekend and I ended up having more issues than I anticipated. That being said, I was finally able to render a test shot out of the farm. My goal for the next deliverable is to have this scene mostly done in terms of foliage.
VFX_448/update_16
March 3rd, 2026
Re-Lighting Scene 3
I spent the past couple of days working on re-lighting the third scene from top to bottom. The current progress with a before and after is below.

Before

After
I wanted to focus on adding depth without darkening the scene too much. Putting area lights around the peaks of the mountains helps add to the scale of the environment.

Creating an Aurora Borealis
To create the aurora borealis seen in the shot above, I decided to use volume shaders in Blender. This allowed for quick iteration over simulating, and also wasn't too bad to figure out.

The node setup for the aurora borealis shader is below.

VFX_448/update_15
March 1st, 2026
Scene 2 Render Test
Over the weekend I had the opportunity to fine-tune the scattering a bit more. This is a very early test with a lot that will change as I progress.
Working the Foreground
One of the toughest tasks I've been trying to accomplish is working on the foreground's foliage as well as filling out the shape of the island.
This has been changed from the render test as I've been adjusting the rocks added to the foreground island as well as adding more trees and grass. In addition, fixing the water shader has been a pretty big priority of mine since I started working on this scene. I made sure to make it match the environment a bit better by adding some transparency.

Here's the node setup for the water shader.

VFX_448/update_14
February 24th, 2026
Render Checkpoint 3
During the past week I've had the opportunity to fix up the third shot for the first environment as well as rendering out the fourth shot. Below is the current progress on the entire animation without comp.
Scene 2 Foliage Scattering
I'm also starting to work on the foliage for the second environment of the animation.

For the foliage in the background I ended up using tree cards to save on memory, but currently they don't match the colors of the 3D foliage closer to the camera. I'm also not sure if I'm going to stick with this method for the final render as it creates very thin shadows.

VFX_448/update_13
February 17th, 2026
Shot 2 Final (No Comp)
Not a big update but an update nonethless! I've gotten the final shot all completed and rendered out save for the render passes I need for compositing. There is now a smoldering campfire along with some adjusted lake fog. Those will have to come later as I'm waiting for a fix for a render farm issue.
Campfire Pyro
The campfire smoke I did pretty quickly in Houdini with ~45 minutes of work.
One of the more important details to mention would be that campfires typically smolder from the occluded parts of the tinder. That was a relatively easy effect to get by using an ambient occlusion mask and narrowing it down with a group expression.


More Shot 3 Progress
I haven't done too much with shot 3 just yet, but my main focus has been adjusting the fog and the tree density. One of the biggest challenges has been trying to give the water a more shiny look and reduce its "CG-ness".

VFX_448/update_12
February 15th, 2026
Shot 2 Progress
This weekend was me working on shot 2, making sure it looks as good as it can be for final render! There are a few graphical bugs that the renderfarm produced that need to be ironed out, but so far I think it's pretty close to done.
EVEN More Scattering
This scattering system was similar to what I did before for the first shot, though this time I get to use camera culling!

I'm pretty happy with how this system turned out. I'm using a lot of repulsion and attraction rules to create a little clearing for the tent and campfire.


Extra Lights
I've also added some extra lights! One in particular highlights the background mountain to really bring out the scale.

VFX_448/update_11
February 10th, 2026
Shot 1 Final (No Comp)
I have gone through a lot of troubleshooting the past day to make this work, but I've got a final render for shot 1! There isn't any compositing JUST yet, though.
Shot 2 & 3 Prep
I had some extra time to begin prepping the work for shots 2 and 3. 2 is going to be a bit more detail intensive, but I think I can get that done over the weekend. 3 shouldn't be too bad and should take maybe a day or so to complete. Below is the groundwork I've lain for shot 2.

The main challenge is going to be creating a convincing looking campsite and filling in the background with enough detail. Below is shot 3 with some minor prep and adjustments.

This shot is going to mostly be making sure the ground textures look good in contrast with the foliage. I believe it's a bit too uniform right now and could be improved.
VFX_448/update_10
February 8th, 2026
Final Shot 1 Render Test
I'm almost ready for my first delivery of a shot for final pixel! Now that I have a basis for all of the environments, I'm going to work in the order of how each shot will play out (aside from the transitions).
This test has some pretty obvious errors, those being the static birds and the fog flickering. These are being worked on and I'll have something more complete by the next blog.
More Scattering
I've been working on a more detailed scatter for the ground, using a plane where the camera frustrum sees the terrain.

Furthermore, I'm using 6 different scatter systems to achieve the look I'm going for. Grouping them together allows me to use the rocks as a collider where the foliage doesn't spawn.

Atmospherics
I've also been working on some additional volumes like low hanging fog and clouds to achieve a more realistic result.

This is a pretty easy effect to get with some simple shader math, shown below.

VFX_448/update_09
February 3rd, 2026
Render Checkpoint 2
Since the last render checkpoint, I've made a lot of progress! I've finished the initial look for the second environment and have begun work on scattering setups for the first shot of the project. Below is all of the progress I have made so far.
Scattering Foliage
I've made initial headway into scattering the trees across the first scene. I'm going to be using a Blender addon called "GeoScatter" so that I can achieve natural, biological growth of foliage. I plan to invest some time into learning SpeedTree to make my own foliage, but for now I have some placeholders.


Later on I'm going to incorporate some of the masks from the terrain from Houdini inside of Blender.
Environment Tweaks
When starting to work on the scatter, I noticed that the grass of the terrain just wasn't working anymore. I didn't have the control I wanted over it, either, since it was a set color map. I decided to switch it for a higher resolution texture map and to use the grass_regions layer that I had set in Houdini as a mask.

Before Adjustment

After Adjustment
I think both have their own charm, but the latter is WAY better for scattering and detail.
VFX_448/update_08
February 1st, 2026
Render Tests of Scene 2
This weekend was spent setting up render tests on the farm and making sure that all the assets would transfer nicely.
The farm render pretty efficiently, but I do need to look more into further optimizing my scenes. Running at a combined total of 183 hours of render time at 33 minutes per frame is pretty long, at least for Blender.

Scattering Test
I also took some time into working on the beginnings of a scattering pipeline. I'm thinking of using Blender's geometry nodes to build a few systems for my scenes but I think that it would be nice to try out Houdini's built in scatter system for heightfields.

I'm using a "labs basic tree" node to setup a pretty simple scattering system to see if this is viable. So far, I think it is. The only concern I have at the moment is matching the position in Blender to Houdini.


VFX_448/update_07
January 27th, 2026
Texturing the Last Environment

Foreground Terrain
Midground Terrain


Background Terrain 01
Background Terrain 02

Final Blender Scene Prep
With the last terrain completed in Houdini, I moved into the setup of the final environment in Blender. This is again a rough setup for the how the scene will look. Nothing below is final!
Something I focused heavily on this scene was scene optimization. Due to the sheer size of the environment, I made sure to gradate the detail on each of the mountains out as they got further away.

Foreground Terrain Textures

Background Terrain Textures
VFX_448/update_06
January 25th, 2026
Since the last checkpoint, I've had some time to sit down and continue to refine my landscape workflow. This weekend was all about making sure that my second environment could be optimized properly, and I think I did so.

Part of prepping this environment was making sure that the shorelines matched up for each landmass. Since the water is pretty still in the reference, I can get away with using a grid.

I've also been working on optimizing my node trees a bit. Heightfields take up a LOT of memory and having less nodes is always better, so cleaning up the trees has been a great way of improving the look. I plan to have the second environment all textured by the next update.

VFX_448/update_05
January 20th, 2026
Render Checkpoint
I've gotten pretty far since the beginning of the quarter! Below is the current progress that I have in animatic form.
Blender Integration
With some smaller tweaks in Houdini, I was ready to bring my project over to Blender for test rendering. Due to the SCAD render farm being SLIGHTLY out of date, I had to use Blender 4.5 instead of 5.0, the latest version.

The method of important is the same, but I'm now using an 8k color map exported from Houdini. I'm also using a volume to create the atmospheric perspective seen in the rendered checkpoint video above.
Below is the third environment integrated into Blender from Houdini. This is a pretty early lighting test to see how the environment would respond to bright, colored lights. Eventually I'll have the Northern Lights in the sky above.

Creating the Second Environment
Now that the first and third environment are in a good place, I'm onto working on the second environment. I'm tackling this one a bit differently, splitting up each island into a different heightfield so that I can push the maximum amount of detail possible out of the terrains. I'm using the terrains from the original animatic imported from Blender as a reference in Houdini.

Then I create the terrain localized to where the detail is needed. This way, I can keep background terrain to a lower polygon count.

VFX_448/update_04
January 13th, 2026
Texturing Continued
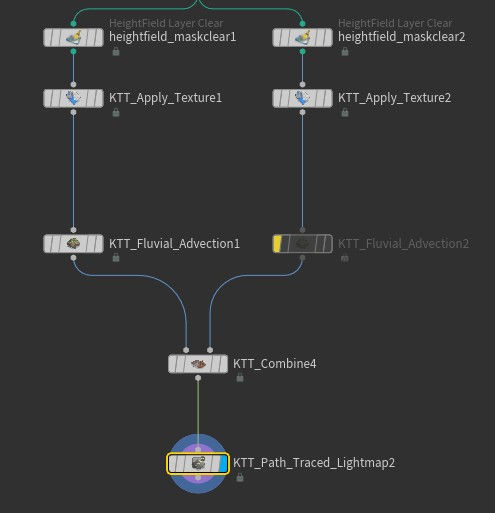
Over the past day or so I've had the opportunity to begin texturing the terrain further within Houdini. I've been working on creating additional masks the ones already provided. The current progress on the first environment is below.

Using KTT, I'm applying 4 different textures to the terrain using custom masks. I then use a fluvial advection node to simulate the "erosion" of the textures as they might flow down a mountain.

The resolution of this terrain is quite large, coming in at a massive 67 million voxels.

In terms of the snowy terrain for the third shot, it's a little more of the same but not NEARLY as complicated. I did end up adjusting the terrain to add more rockiness to certain areas. This makes the snow-cover a bit more accurate to real life reference.

The extra detail is obtained by using a "terrace" node to add micro noise into the terrain which is then eroded away.

The extra detail is obtained by using a "terrace" node to add micro noise into the terrain which is then eroded away.

With Terracing

Without Terracing
VFX_448/update_03
January 11th, 2026
Terrain Creation in Houdini Continued
Over the weekend I went ahead and created the third environment for the short. One of the things I learned while creating these terrains is that keeping the node count low conserves memory and helps keep things responsive. The node setup and terrain result are below.


This terrain required a special method to get the result that I wanted. The mountain on the right required a different erosion method than I wanted, and I had to split the tree and use a KTT combine node to merge the heightfields back together.

Starting to Texture
One of the the parts I've been dreading is texturing the terrain. I enjoy texturing large landscapes, but I haven't really found a great workflow just yet. The first thing I tried doing was exporting some masks into Blender. Unfortunately, though, this lacked the granular control of what Houdini's heightfield system offers.

Additionally, the node networks in Blender can get messy fast when working with masks.

What you see above is not what I wanted. The overall workflow is tough to work with and I don't think it's great at providing good results. Fortunately, KTT has a solution. Below just two textures are applied, and the results are already leagues above what I had in Blender.

There isn't any grass just yet but I'm slowly figuring out the workflow. The node setup for the result above is below.
VFX_448/update_02
January 6th, 2026
Terrain Creation in Houdini
Instead of using Gaea, I decided to use Houdini's heightfields to create the terrains. I'm using a custom toolset called KTT (Kruger Terrain Tools) created by Samuel Krug. These tools not only streamline terrain creation, but they also build upon the tools that Houdini provides.

Image courtesy of Samuel Krug.
The node setup for and the landscape for the first scene is what's shown below. Kruger's tools sped up the process significantly, allowing me to art direct the look of my mountain range with ease.


I'm not quite done with the terrain yet, but I'd say it's mostly there. Bringing the heightfield into Blender is quite simple. I'm using an exported EXR map of the heightfield to displace a plane using a displacement modifier.


Ray Portals
The first transition is quite difficult as I essentially have the camera "dive" into a painting. This is a pretty big challenge in itself, especially if I want to composite the effect. Fortunately, Blender offers a way around this issue: the ray portal BSDF.

The ray portal node allows you to project different parts of a scene onto geometry, literally like a "portal"!
To make this work, a direction (think of rotation on a 2D plane) and position are needed. The position determines offset from the portal surfaces location in 3D space so that it can project a different part of the scene. Below I'm using a driver connected to a camera's XYZ location.

The direction of the portal is determined with a similar method, although to line it up with the center of the painting, we need to move the UV coordinated by 0.5. The Z coordinate's value can be changed to adjust the "FOV" of the portal.

VFX_448/update_01
January 4th, 2026
Reworking my Pipeline
With the animatic completed in my VFX 408 course, I had some time to think about my pipeline for the short film. Originally, I intended on using primarily Houdini and Solaris. This turned out to be a bad idea, though, for a few reasons.
The biggest would be purely TIME. Solaris is not like traditional rendering pipelines and contains arbitrary rules and limitations that make production for solo artists difficult. For this reason, I decided to set up my first shot in Blender and compare the two. Below is what I rendered out in Blender.
When setting up the scene in Blender, material creation and texture assignment took about 10 minutes. This, in Houdini, took about 1 hour. Lighting setups are also a lot easier as well. I've provided a split-screen comparison between Blender (Cycles) and Houdini (Karma) below.
Blender
Houdini
Another big reason for switching to Blender was render time. On the SCAD renderfarm, Blender's Cycles renders in about 12 minutes per frame (on the current scene). On my home machine, it's 5 minutes.

One of Houdini Karma's biggest flaws as that it is not purely a GPU renderer, even on XPU. This means that while XPU feels snappier, Houdini has to enlist the CPU as well. My times almost match the renderfarm times, making at home rendering exponentially harder if the farm is busy.
There is still one more reason for switching and it has something to do with how Vulkan is handled by Houdini 21.0.440. When you have a lot of texture maps in a scene and switch to Vulkan, you will often get a fatal error and Houdini will crash, like on the right.

My best guess as to why this is happening is that Houdini is loading too many textures into memory at once and it causes a crash. This crash can be averted by disabling all material, switching to Vulkan, and then turning each material back on 1 by 1.
Unfortunately, I don't find Karma to be a good, production ready fit for my animation. I would love to use, but as a solo artist it feels needlessly cumbersome.
November 9th, 2025
VFX_408/update_13
Shot 1 Test Render
For the last weekend of the quarter, I spent my time on texturing and lighting the museum environment so that it could be ready for render. After a lot of back and forth with substance, I finally settled on this for the final look. This is the raw render with no compositing just yet.

Lighting the Environment
Lighting in Houdini is a bit challenging compared to programs like Maya and Blender, especially when it comes to instancing those lights. For this project I wanted to use light instancing to get the spotlights on each painting in the back. For this, I used a USD Configure Prims from Points node.

This allows me to instance primitives (or lights) on points. I'm bringing in some points from the SOP level into stage so I can use them as points to instance on.


Additionally, I'm using an HDRI and an area light directed on the display wall to brighten up the foreground. There is a hidden shadow catcher in the image below preventing HDRI's light from leaking through the opening.
Texturing the Environment
One of the best ways to achieve realism in 3D is by following a PBR workflow. Because I'm going for such a realistic look with this short, I didn't think procedural textures would be the fastest and best way to achieve realism. Therefore, I decided that I would use Substance Painter and Quixel Bridge for my surface work.

Fun fact about the artwork of the background paintings: they're filtered versions of my work from the past year at SCAD!
I then applied a canvas weave material on top of the original stylized artwork. I think it's a bit overkill for the distance that the paintings are viewed at, but the lighting does bounce off them nicely.

November 2nd, 2025
VFX_408/update_12
Moving to Houdini
I'm finally onto integrating the first environment into Houdini and prepping it for rendering. The first step, however, was readying the environment's UVs for texturing. I used Blender for this as it's a bit more straightforward than Houdini's UV toolset.

Next, I brought in the camera and environment as two separate alembic files. I then split each alembic down into 6 separate SOP networks for easy texture assignment and organization.

Each network looked somewhat like this, breaking down each of the models' individual sections for material assignment.

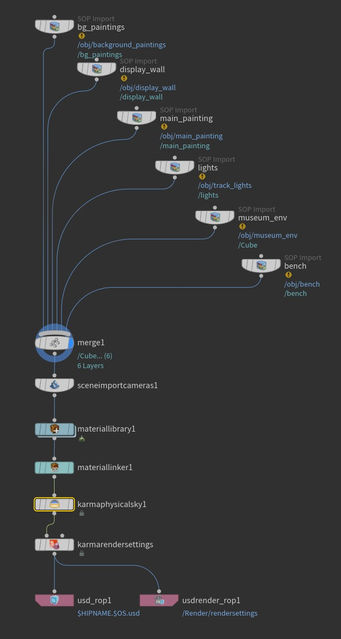
Afterwards I brought every mesh into Solaris with a relatively simplistic setup (left). I also went and created all of the necessary materials (bottom).

The next steps are creating the material and lighting setups and doing a test render for a transition composite.
October 26th, 2025
VFX_408/update_11
Modeling the Museum
I spent the past couple of weeks working on the basic museum environmentand compositing it with the layout of the first environment.
When I'm making an environment, it's important to me that I'm building the environment to scale. Not only does it help when it comes to tasks like scattering, but it also plays a massive part in lighting and FX. That's why, when modeling the museum, I used a human armature model to make sure the scale was correct.


My museum environment is based off of a real location, that being the Portland Art Museum. I really liked the minimalist, yet tasteful interior.
The environment is completely modeled around what the camera sees, as there aren't any reflections to be seen.

Additionally, I modeled some tracked lighting and placed temporary placeholder spotlights where other lights will go once in Houdini.

Nuke Test
Once I was done modeling, I quickly playblasted the new museum scene and the previous animatic environment. Since they're 2 separate scene files and will be handled the same way later in production, I wanted to see if I could devise a quick method for iteration. Below is what I came up with and what I've submitted for the class 15 checkpoint.
Below is the Nuke script. It's simple for the moment, but I plan to make it a bit more complicated as I move forward and begin working with render passes.

I tried a few methods, but I determined the best looking transition to be retaining parallax from frame 1 instead of doing a frame-hold until the camera gets close. This reduces the snappiness of the transition but it does break the illusion. I'll likely change this further down the line, but it's okay for now.
October 7th, 2025
VFX_408/update_10
Final Animatic
After some final tweaks to shot 3 and an actual ending, I've completed the entirety of the animatic. The final edit is below.
October 5th, 2025
VFX_408/update_09
Retiming the Animatic Cont.
I've further implemented the retiming changes all the way to shot 3. This has required some rethinking on the secondary transition, as I want time to conclude the animatic. By the end of the second shot only 20 seconds remain in the song. This resulted in having to shorten it down quite a bit.
September 30th, 2025
VFX_408/update_08
Retiming the Animatic
I spend the past couple of days figuring out how I'm going to retime the animatic to fit my chosen soundtrack from the last update. So far I've made it halfway through.
September 28st, 2025
VFX_408/update_07
Finding a Soundtrack
This weekend consisted of searching the web for a royalty free soundtrack that I could use in my animatic. The theme I am aiming for is an adventurous, grandiose track. I've placed the track that I think fits best with the animation along with a backup track below.
This is the track that I believe fits best. I am now realizing, though, that I will need to redo timings on the entire animatic in order to fit the soundtrack. That will be this week's task.
Additionally, I have an extra soundtrack that could potentially work better on timing.
September 21st, 2025
VFX_408/update_06
Finishing Touches
I spent the weekend making some touch-ups to the pacing of the animatic as well as redoing all of the shots to create more variety.
On top of this, I also finalized a rough look for the first environment after reducing its complexity.

Instead of a sprawling mountainscape with a town, I decided to go for a secluded valley approach with a few smaller structures. This also allows me to focus more on the scale of the environment rather than the complex little details.

Animatic Version 2
Here's the final animatic with all of the adjustments I've been making over the past couple of weeks. I also included the timecode and shot number so I can adjust the pacing later.
September 16th, 2025
VFX_408/update_05
Redoing the Second Transition
After working on the first transition, I realized the second transition from shot 2 to shot 3 also needed some work. I spent today remaking the transition.
Considering the cold environment the camera is traversing into, I decided that traveling through a freezer would be a fitting transition.
Further on I plan to include snow and steam in the fridge to show how cold it is.
September 14th, 2025
VFX_408/update_04
Diminishing the Scope
After talking with Professor Pasquale and a few of my friends I realized that the first shot of the animation was exceptionally ambitious for what I wanted to do. Instead of a valley with a whole town, I'm going to focus on the details of the environment from a closer perspective.
I spend this weekend working on the initial layout for the new environment along with some essential elements for the transition.

The environment is missing some generic tree and shrubbery layout as well as a river to complete the layout, but that's the next step.
Redoing the Transition
The more important task to complete this weekend was figuring out a creative and unique transition from shot 1 to shot 2. I decided to go with a transition where the camera goes through a house filled with water. I'm looking to further tweak it so that when exiting the house, the camera is under the lake in shot 2.
I was also tasked with deciding if I wanted to have the short be seamless with no cuts (ex. a drone flight) or to have cuts. I'm going to go with the latter as it allows me to curate the environment more for specific angles and focus on detail more easily.
September 7th, 2025
VFX_408/update_03
Final Rough Animatic
I've spent the last few days of summer blocking out and polishing the final animatic. Each shot is split into its own scene so that I could keep things organized. However, this did introduce some timing problems between cuts. The camera stops moving between shots which wasn't my original intention. That will be polished later on when I begin working on the first scene.
As for the final animatic, you can view it below!
September 3rd, 2025
VFX_408/update_02
Animatic Progress
To begin preparing for this exceptionally long project, I started with creating an animatic showcasing all of the basic layout and camera movements to get the idea across. This also helps with pacing for the short.
The layout of the environment is quite simple, consisting of a few duplicated premade mountain assets and a sculpted terrain to match the previs reference.

The finished first of three parts of the animatic can be seen below.
VFX_408/update_01
August16th, 2025
Concept
For my senior project at SCAD, I want to create 3 massive environments and interconnect them through a series of paintings in a gallery. Essentially, the camera will be "diving" into each of the painting, showing a vast 3D environment that the viewer will navigate. It's like the viewer will be on a drone with infinite battery and range!
The main inspiration for the idea comes from the Coca-Cola Masterpiece ad, shown below:
I want to go for natural environments mixed in with some human elements. I appreciate the chaos and beauty of nature and I would like to express it in this short.
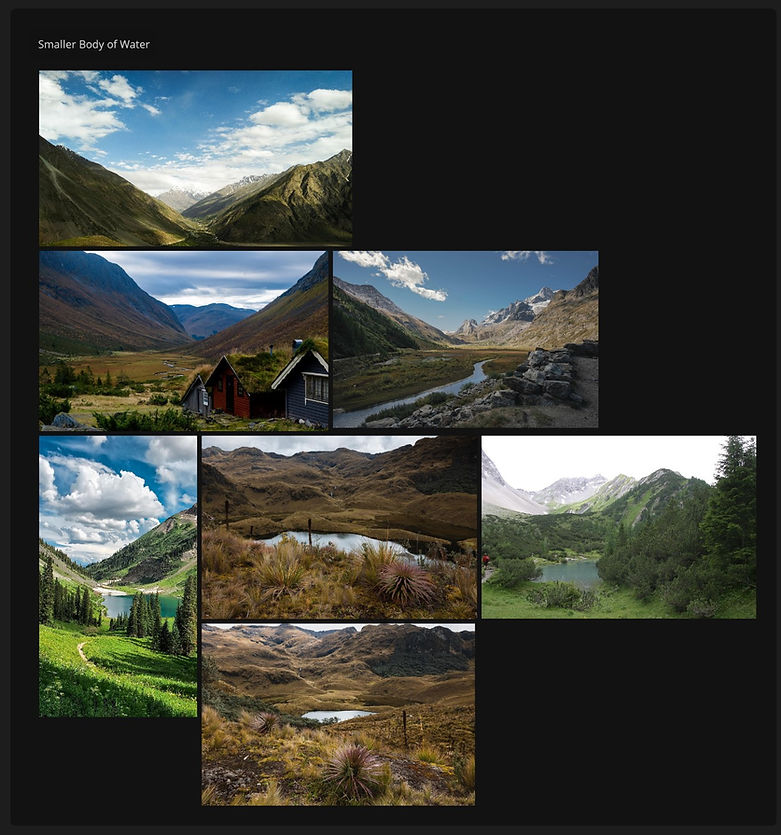
To get started, I've created a mood board of sorts for early conceptualization of the environments I'll be creating. I used PureRef to create the mood board.
Mood Board